Bolero Cheatsheet - V2 - WIP
Introduction:
This cheatsheet will cover the set up and integration of each component within a Bolero matrix individually and go throught the integration for each piece.
Notes:
All REIDEL Components must be on the same firmware otherwise they will not be compatible with each other.
To update the firmware of the beltpacks, go here.
To update the firmware of the IO, go here.
Creating the Network Space (Bolero Antenna):
Connect your LICENSED Antenna to Power.
Antennas accept POE or 12v DC via 4-pin XLR.
Note: If powering via switch, the switch must be PTP.
At CineArk, we stock Aruba's and XXXXXXXXXXX
If powering via POE/Switch: You will need to connect to the AES67/Config port
Connect your laptop to the AES67/Config Port via RJ45 Ethernet.
Look on the screen, in the bottom right corner will be an IP Address.
Put your laptop onto the same subnet like you would for RF RXs
Punch the IP address into a browser and connect.
Click the antenna to highlight the Antenna and select the + icon and Create a new Network Space.
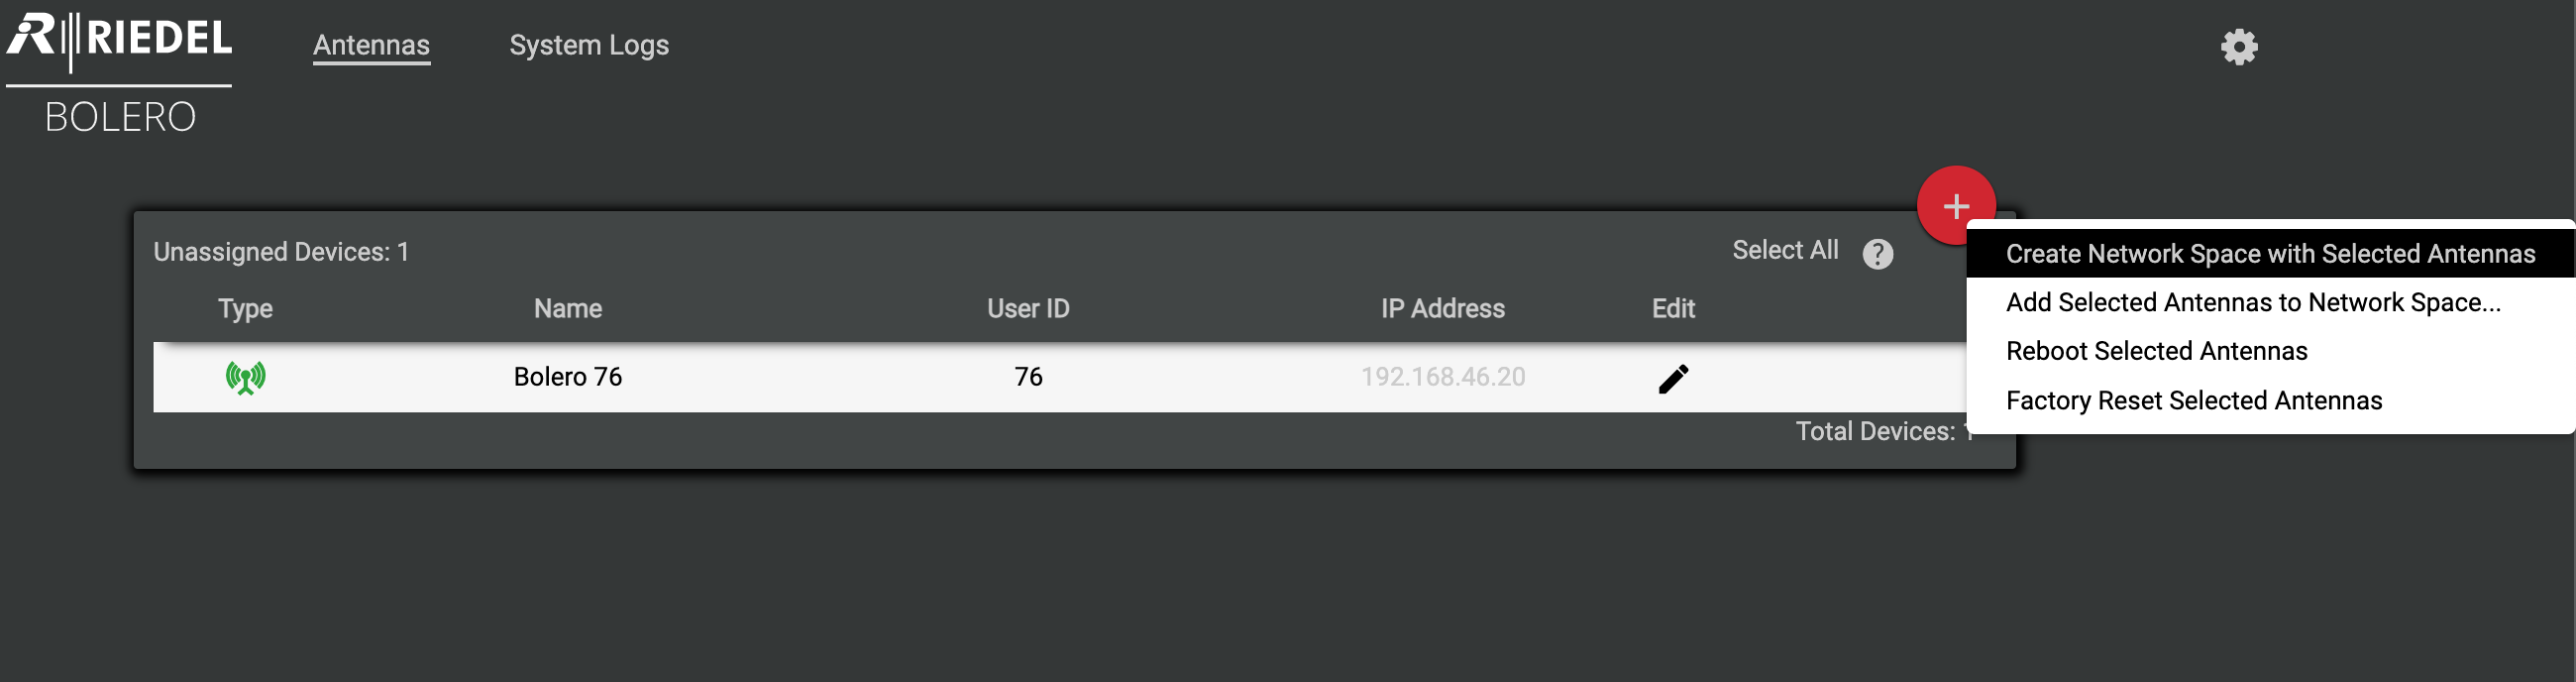
Create the Network Space
Set the name as the Production Unit or Kitroom Test
Select Standalone/AES67
Set the admin Pin as: "0000"
Highlight the Antenna and select Edit
General Settings: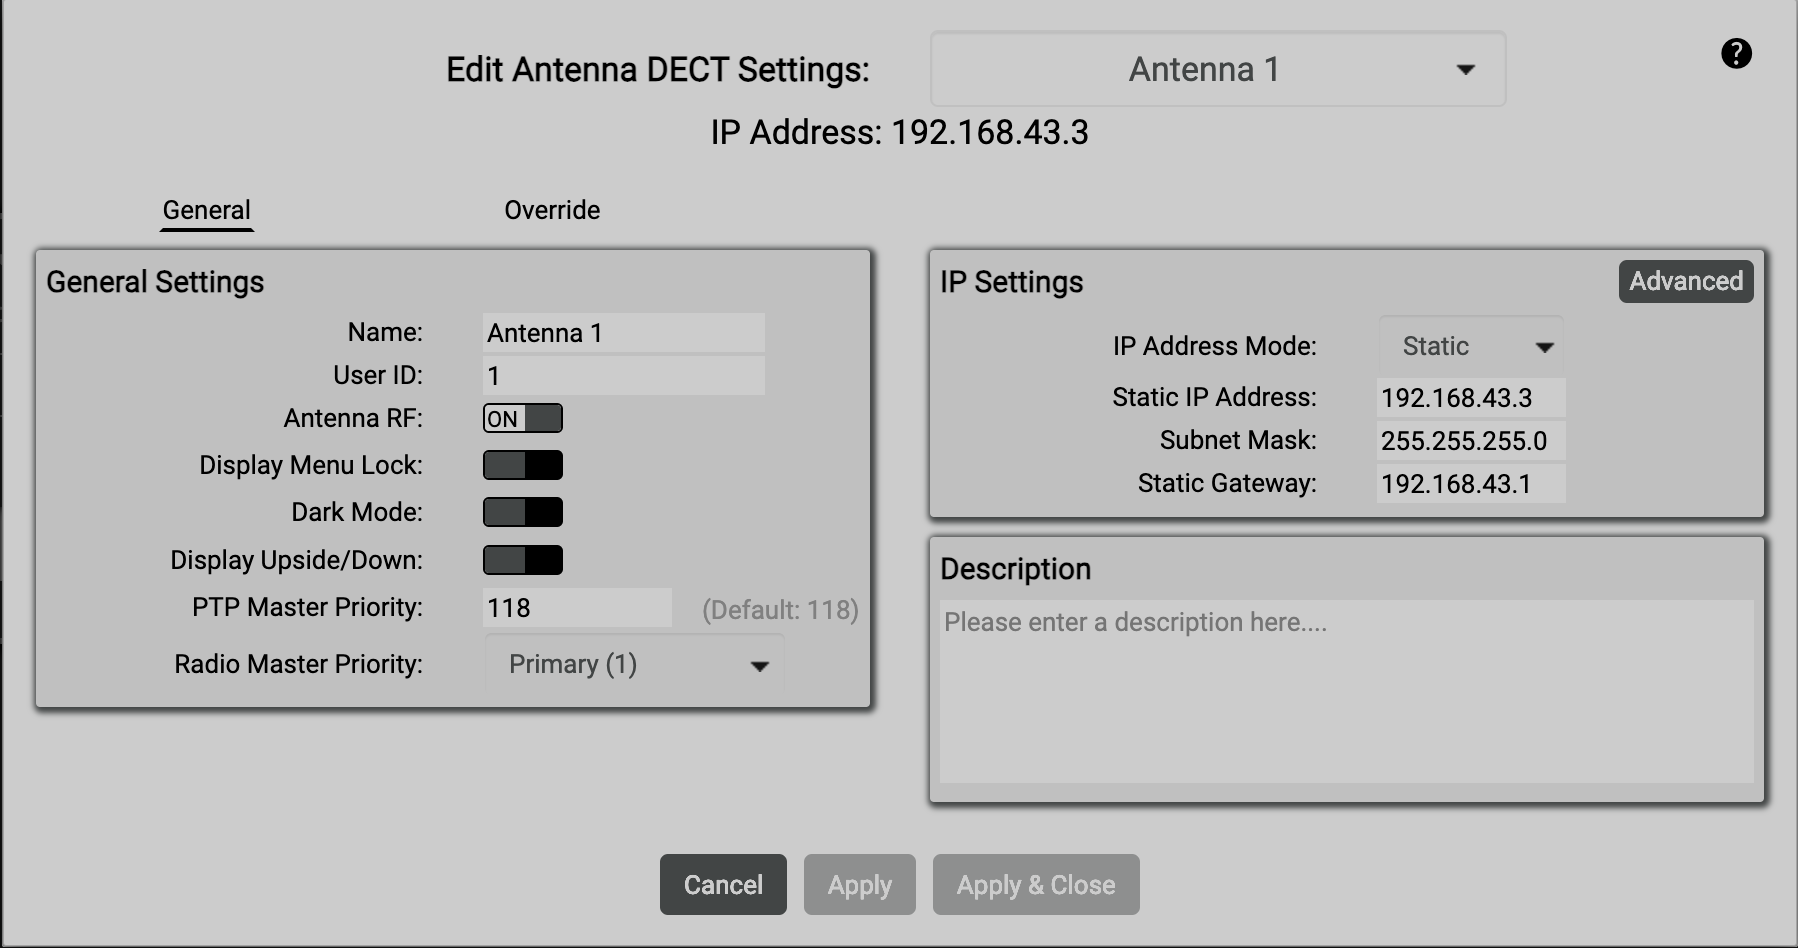
Give your Antenna a name:
I always name my first antenna as MASTER, but this will almost certainly be changed by the operator.
Give it a User ID
This should be done sequentially. Start with 1 and go up 1 for each new antenna you introduce.
IP Settings:
IP Address Mode: Static
Static IP Address: 192.168.43.X
This can be any AVAILABLE address on this subnet. However, it is good practice to keep this tidy.
For example: My preference is to start at .11 and go up in line with the User ID. This gives me an extra point of reference when troubleshooting as it's a super simple way of remembering which antenna is which without seeing the actual name.
UID1 = 192.168.43.11
UID2 = 192.168.43.12
UID3 = 192.168.43.13 and so on.
Subnet Mask: 255.255.255.0
This is a 24-bit subnet mask, which is something you will have encountered before.
Static Gateway: 192.168.43.1
Our comms matrix's do not have DHCP control and therefore setting the gateway as .1 is best.
However, if you are rigging into a DHCP based network, you would set this as the router.
Press Apply & Close once you are ready.
If you have changed the IP Address settings you will need to connect to the new IP.
You have now created a NET and Assigned your first Antenna.
Adding Extra Antennas:
Connect your Antenna to Power.
Connect your laptop to the AES67/Config Port via RJ45 Ethernet.
Click the antenna to highlight the Antenna and select the + icon and Add Selected Antennas to Network Space…
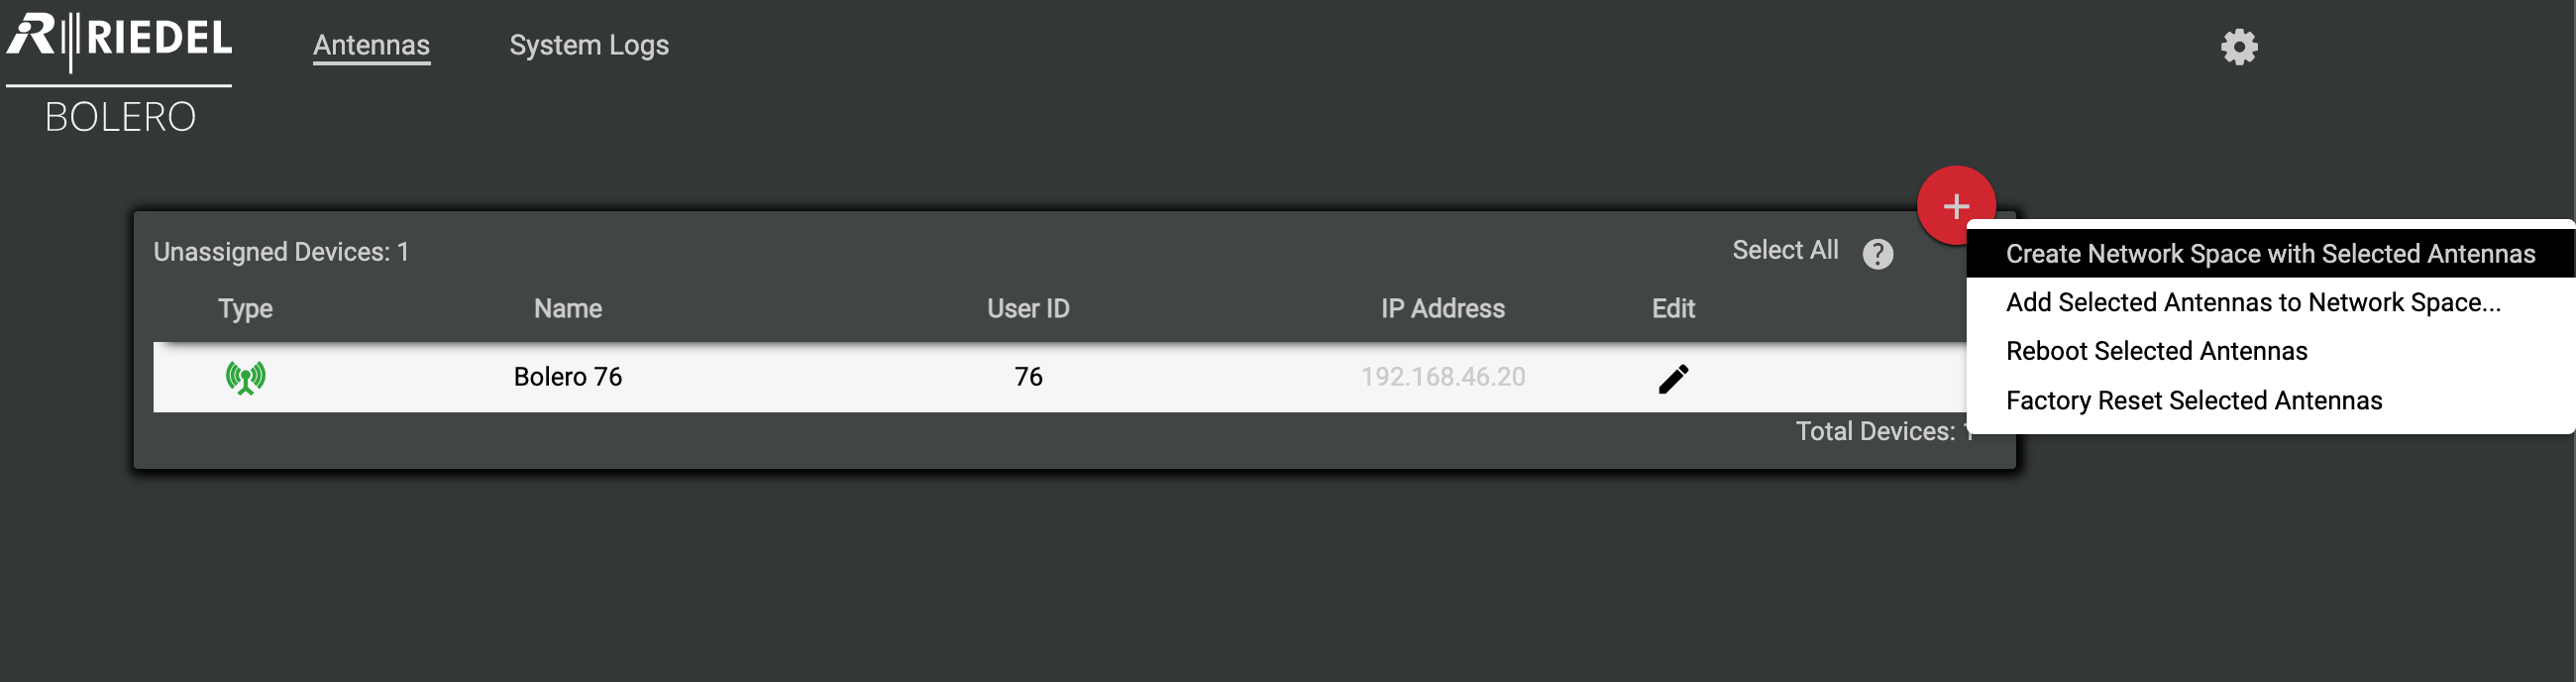
Highlight the Antenna and select Edit
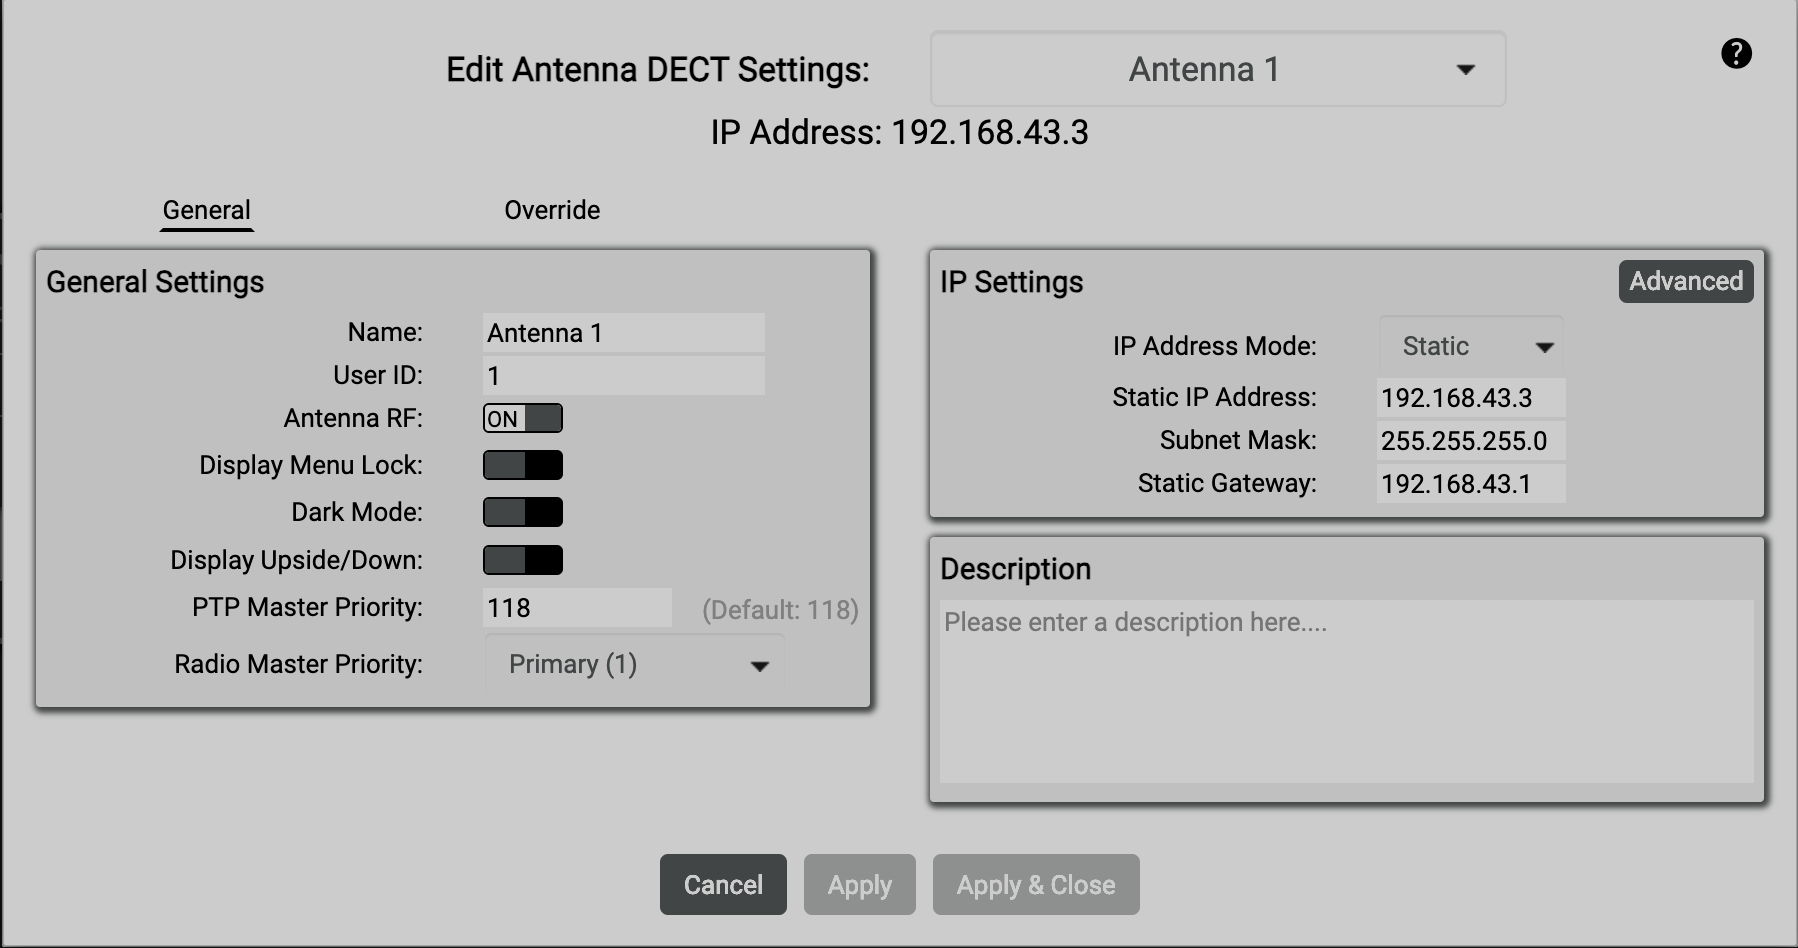
General Settings:
Give your Antenna a name:
For example: Antenna 2.
Give it a User ID
This should be done sequentially. Start with 1 and go up 1 for each new antenna you introduce.
IP Settings:
IP Address Mode: Static
Static IP Address: 192.168.43.X
This can be any AVAILABLE address on this subnet. However, it must not conflict with any Antennas already on the net or they will clash.
Subnet Mask: 255.255.255.0
Static Gateway: 192.168.43.1
Press Apply & Close once you are ready.
If you have changed the IP Address settings you will need to connect to the new IP.
Beltpack Set Up:
On the Antennas Tab, Highlight the Antenna and select the +, Select Registration Mode
There are 2 Registration Modes, Over The Air (OTA) and Near Field Communication (NFC).
In the kitroom, I recommend we use NFC as it is much faster than OTA.
In Situ, I recommend using OTA as it may be difficult you to reach the antenna once it's rigged.
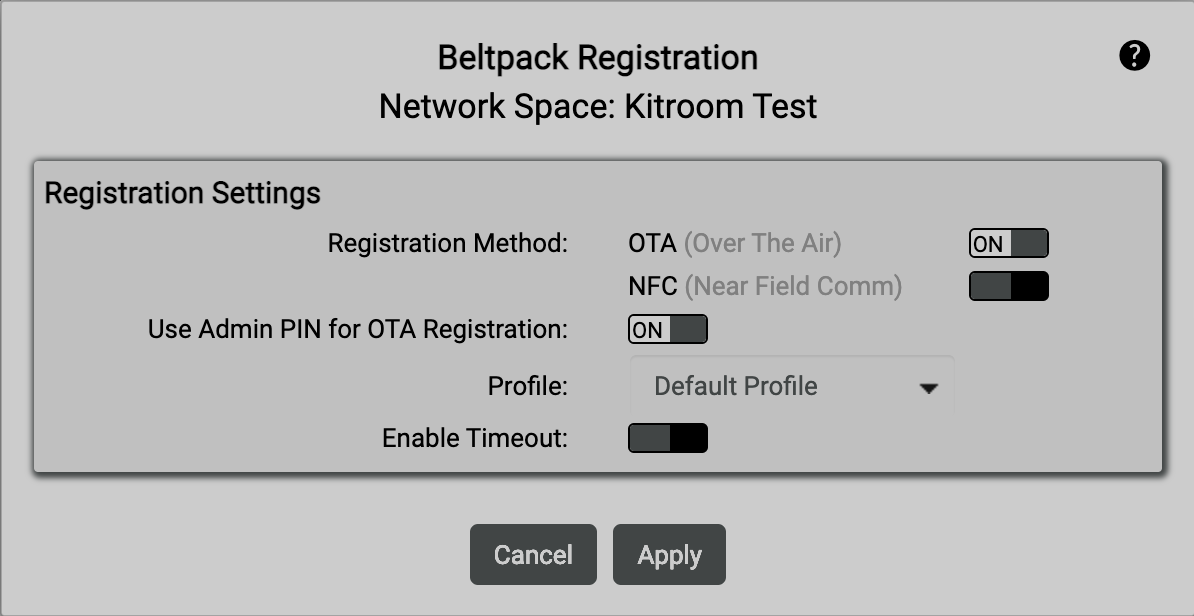
Toggle NFC/OTA On
Toggle Enable Timeout and set it to 5 minutes.
Turn on all of your beltpacks.
Move your beltpack against the front of the antenna.
There will be a NFC contact point on the front of the beltpack underneath the Reply Button. There will be a matching point on the antenna where they should meet.
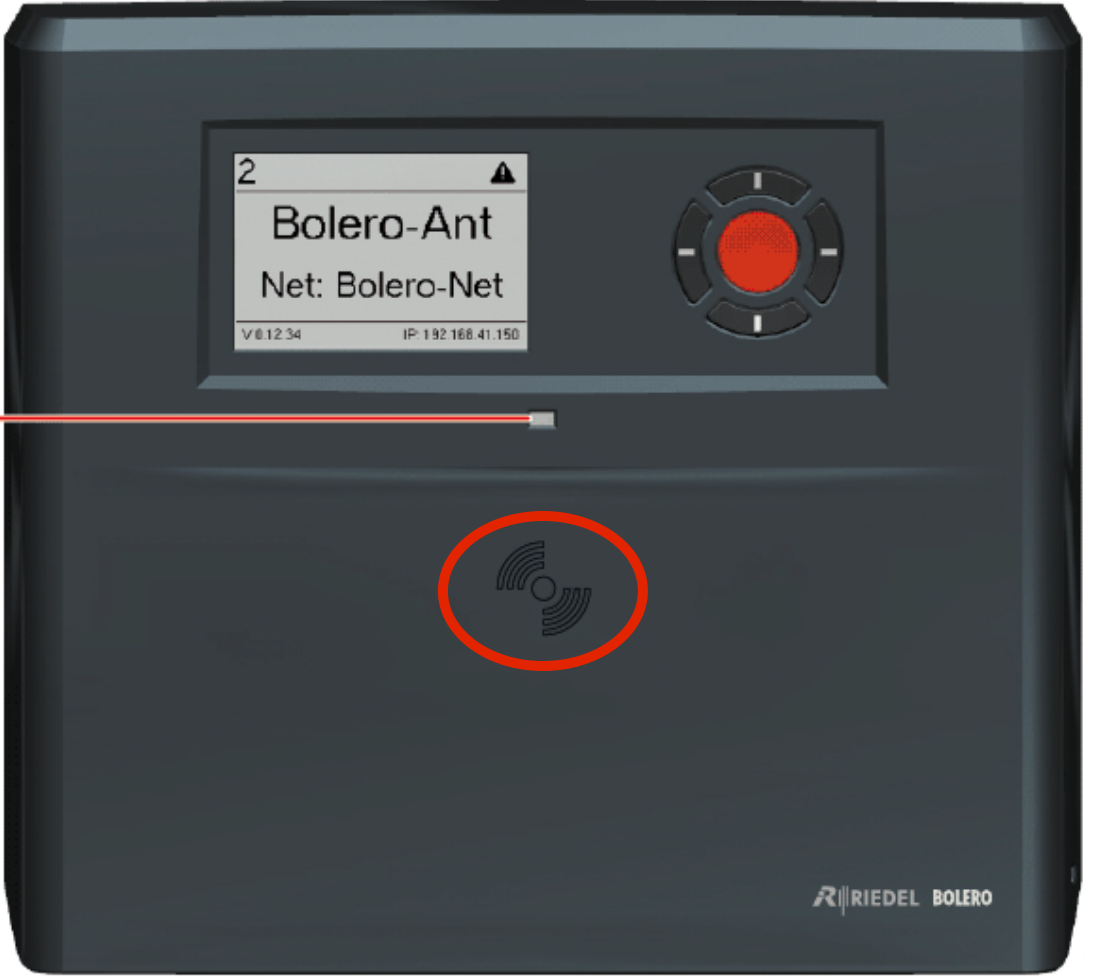
Sometimes a beltpack is a bit fussy about this, and so if it doesn't work you can try placing the XLR side on the antenna to get it to work.
I have no idea why this works, it just does so we don't question it. lol
Repeat this for all of beltpacks.
Like Antennas, we need to assign the beltpacks IDs. Navigate to the Beltpack Menu on the Web GUI which can be found at the top of the screen.
This will display all your beltpacks.
Press Select All
Press the + icon to open the menu
Then Press "Auto-Assign User IDs"
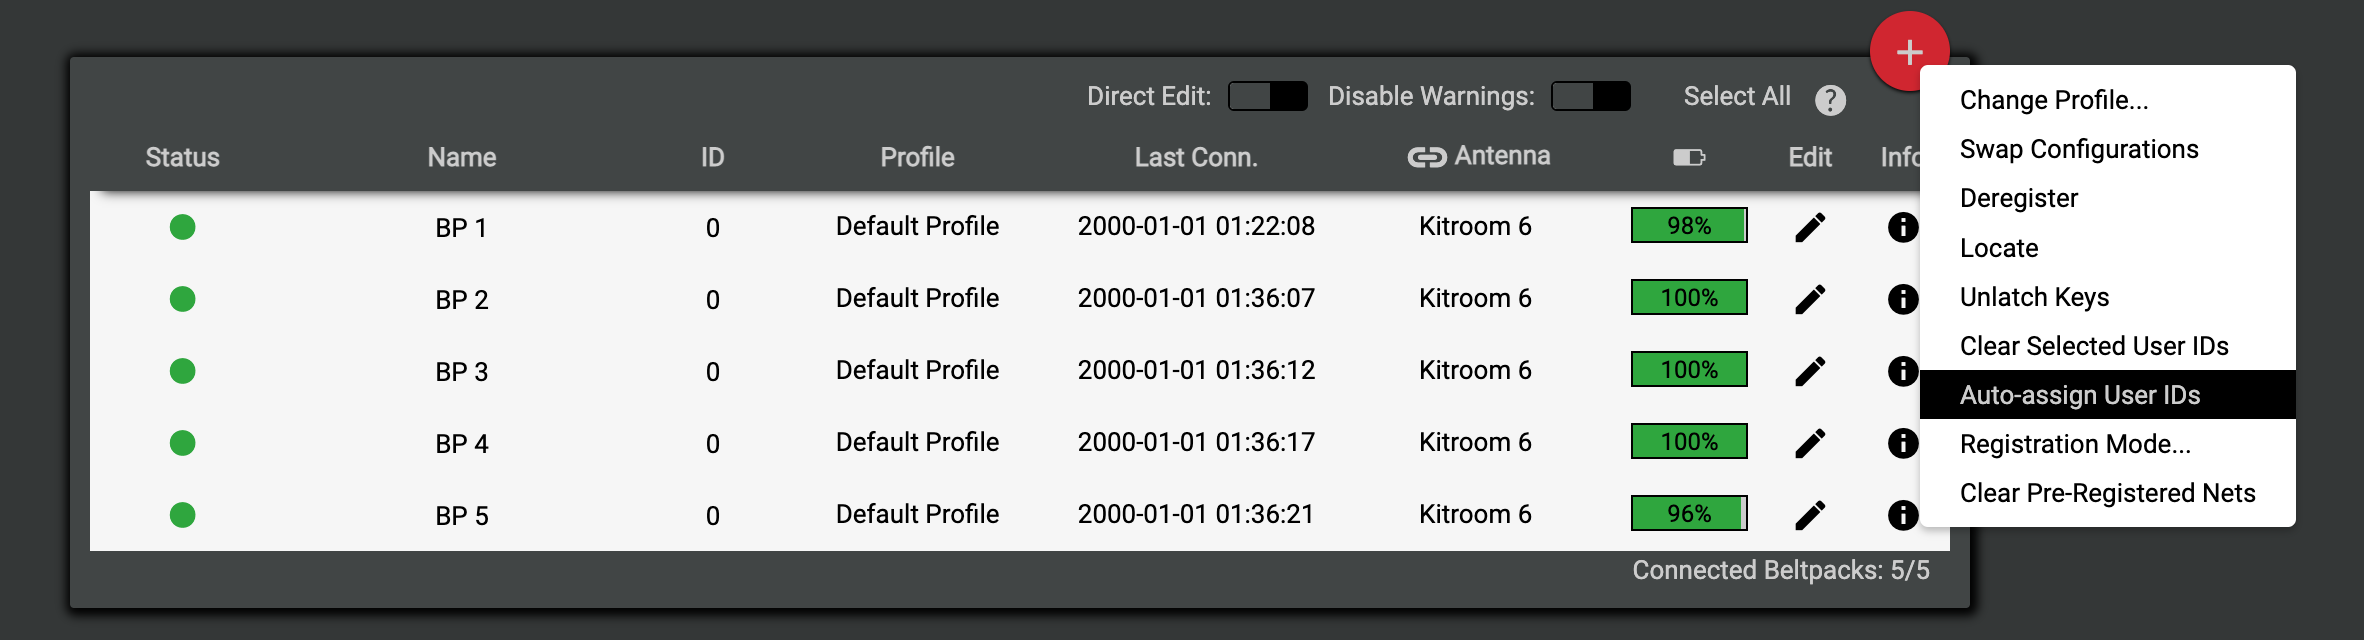
This is a good opportunity to name any Beltpacks, if you need to.
Once you have done this, test your beltpacks.
Testing - Beltpacks - Check-in:
To test our beltpacks we need to check that every feature and button works as intended. Unfortunately for check-in, this means a lot of doubling up.
Find a friend and have them put on a beltpack and headset.
Put your own headset and beltpack on. Your friend can mirror the steps you are about to undertake.
Both of you press the menu button.
Press Button 3 to exit this menu.
Press the big red reply button.
This will either do something if it is programmed too OR flag a "Not Available" message.
Either is fine, we are not testing the function but rather the hardware so as long as it does something we can be satisfied.
Move the rotatary by button 1 to the right until the beltpack reaches max volume
Move the rotary by button 2 to the left until the beltpack reaches -18db.
Plug your beltpack into a USB C PSU, it should then charge.
Once we have done this, now we can move onto checking buttons 1 through 6 work correctly.
Press and hold button 1. Once you have it held, say "Radio Check 1".
Your friend should be able to hear you over their headset. If they do, they should reply "Good check" on the same partyline.
Rinse and repeat step 10 & 11 for buttons 2 through 6.
Now that know both of these beltpacks and headsets are working, your friend can now latch channel 1 open by quick pressing button 1. They can now go about their day and will only need to reply Radio Check from now on.
They should note they now have an open comm. If they'd prefer not to, they do not need to latch their beltpack, this is just so they can be handsfree.
Repeat this process for every beltpack you are testing.
Once all beltpacks have been tested with a headset. They must now be tested with a bluetooth headset. Luckily, we only need to a single partyline radio check for this.
Disconnect your wired headset
Press and hold the menu button
Scroll down using a rotary wheel to Bluetooth and press 4.
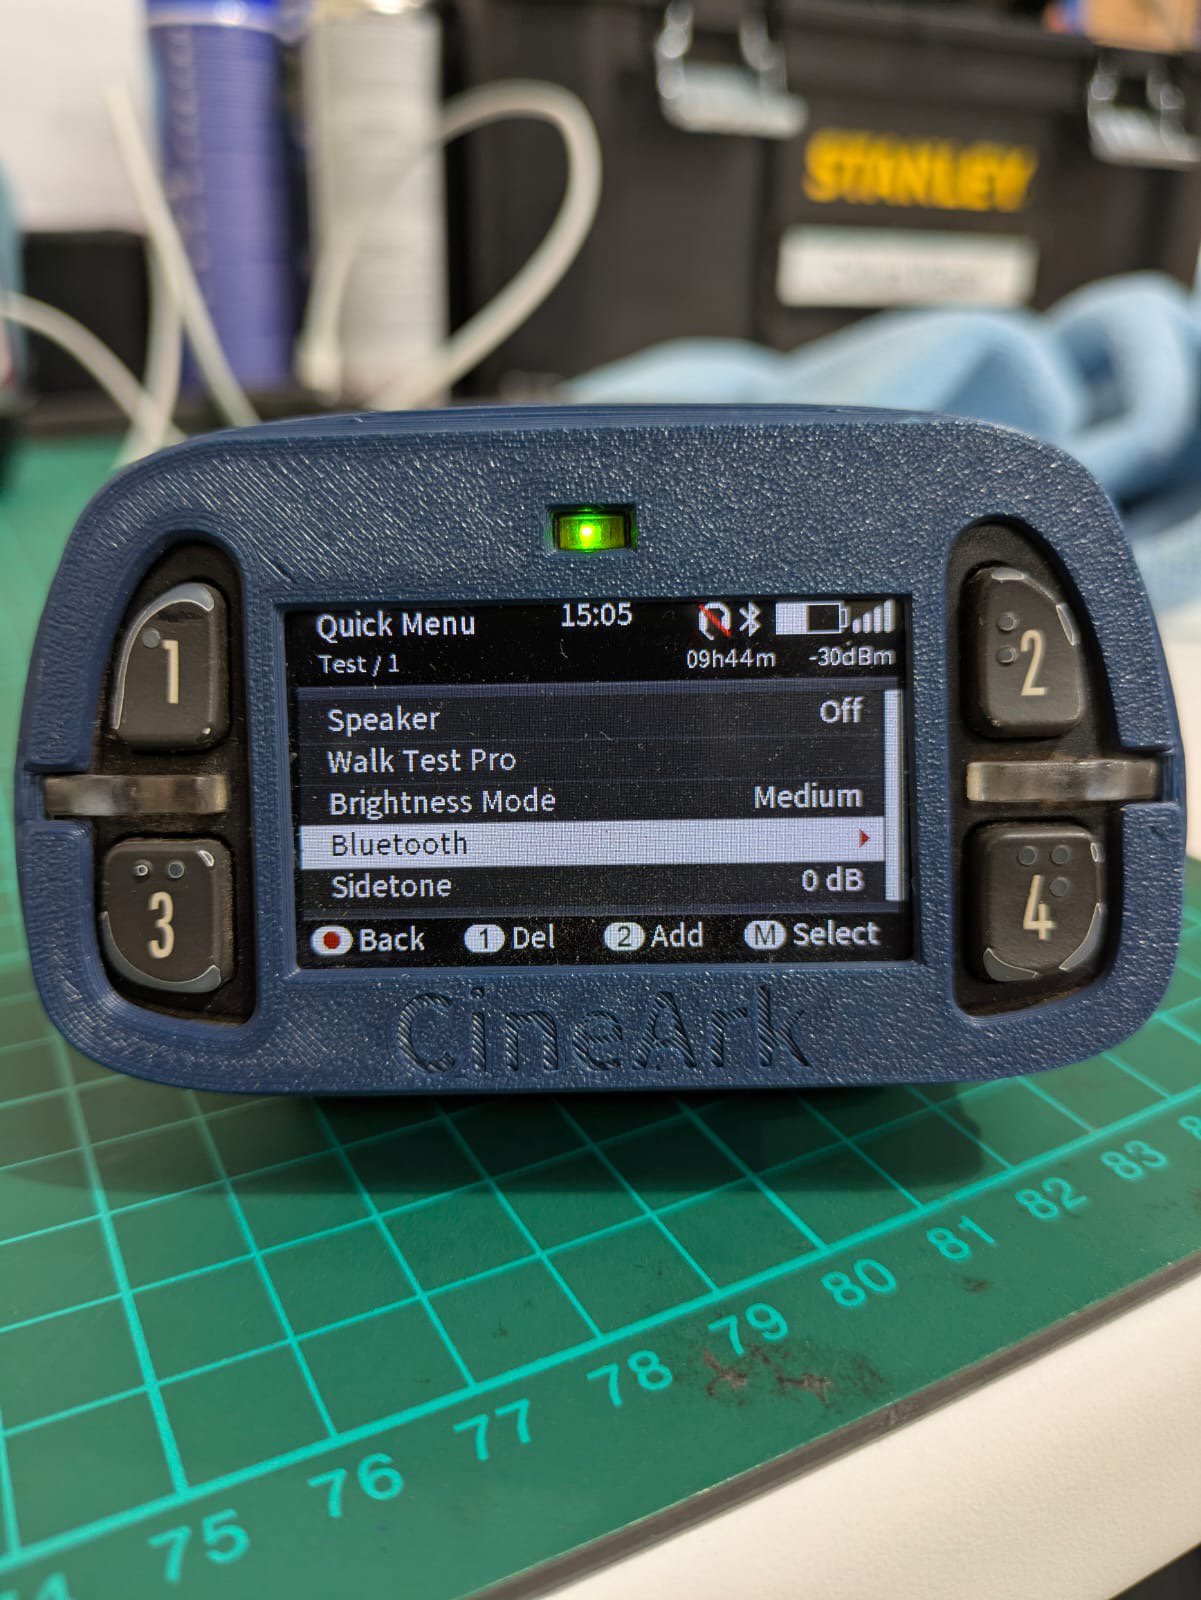
Press 4 again so you're selecting BT State
Scroll and select connect to headset and press 4 to confirm.
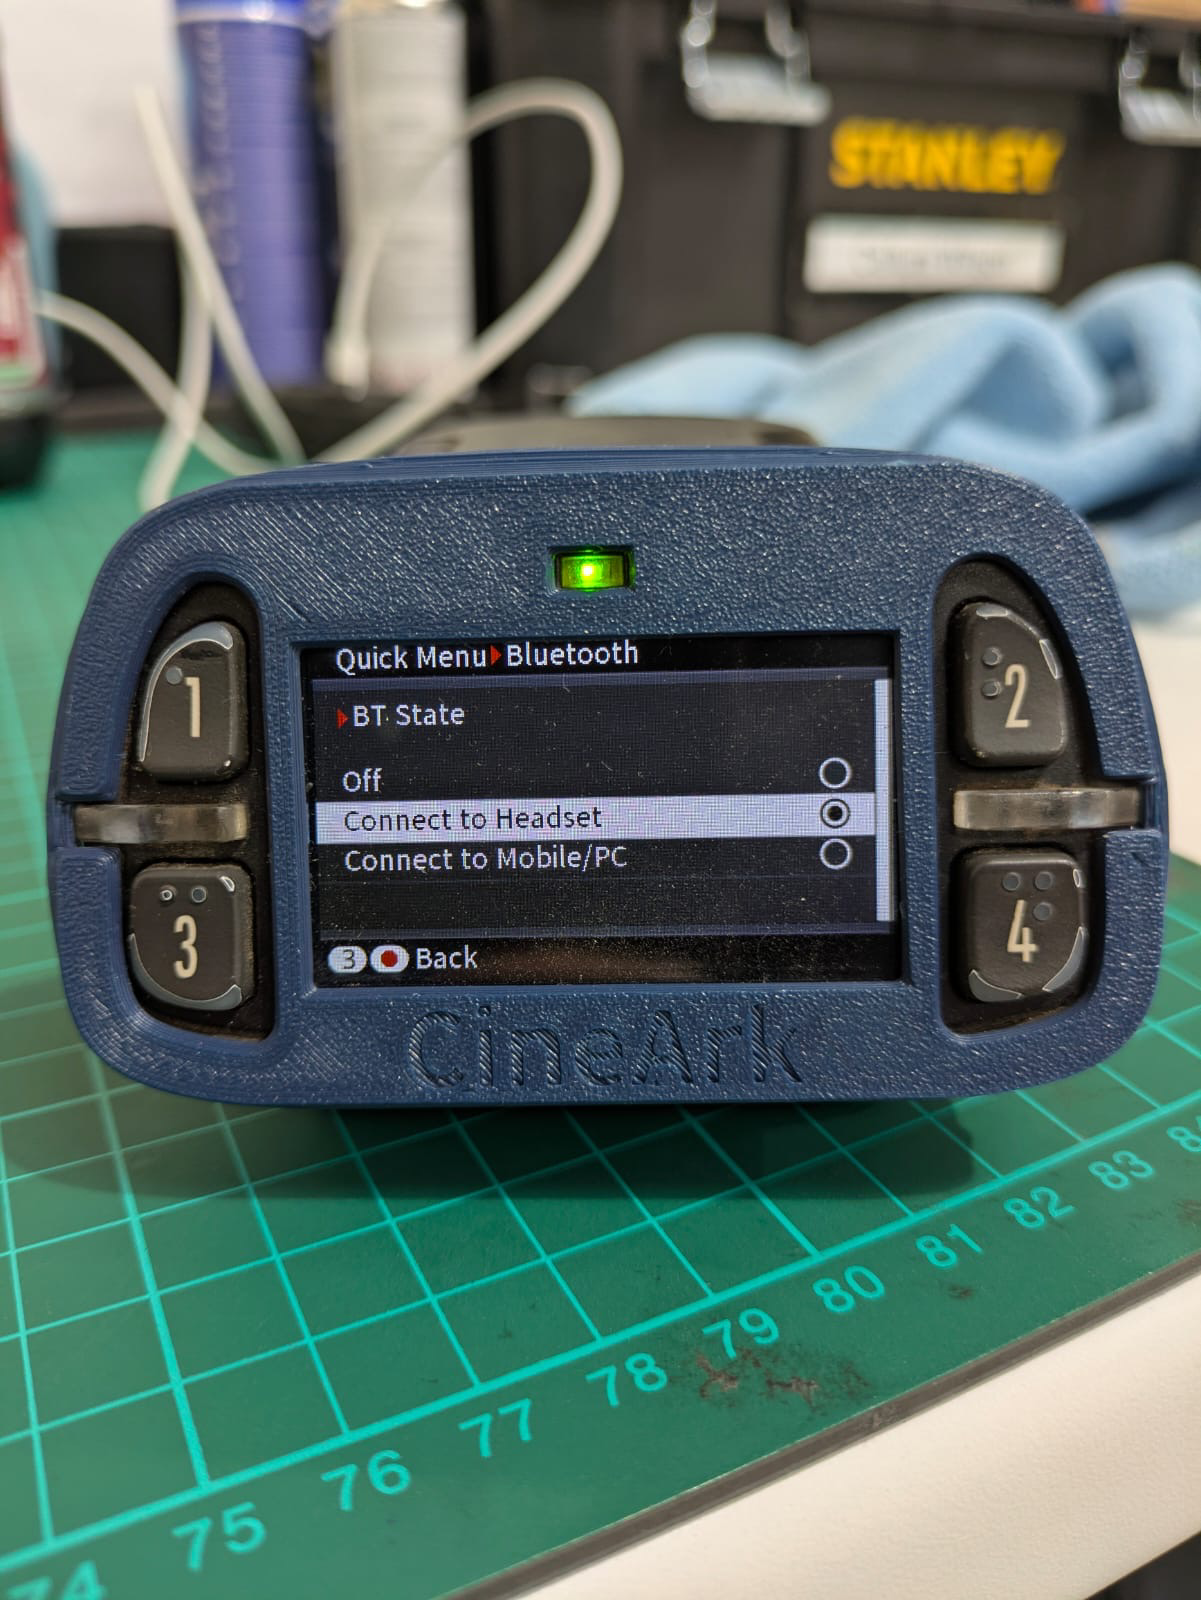
Turn on and get your BT headset into pairing mode.
For Aftershokz, simply continue holding the power button and will eventually say "Pairing".
It will stay in this state for 90 seconds.
Scroll to Pair and select it with 4.
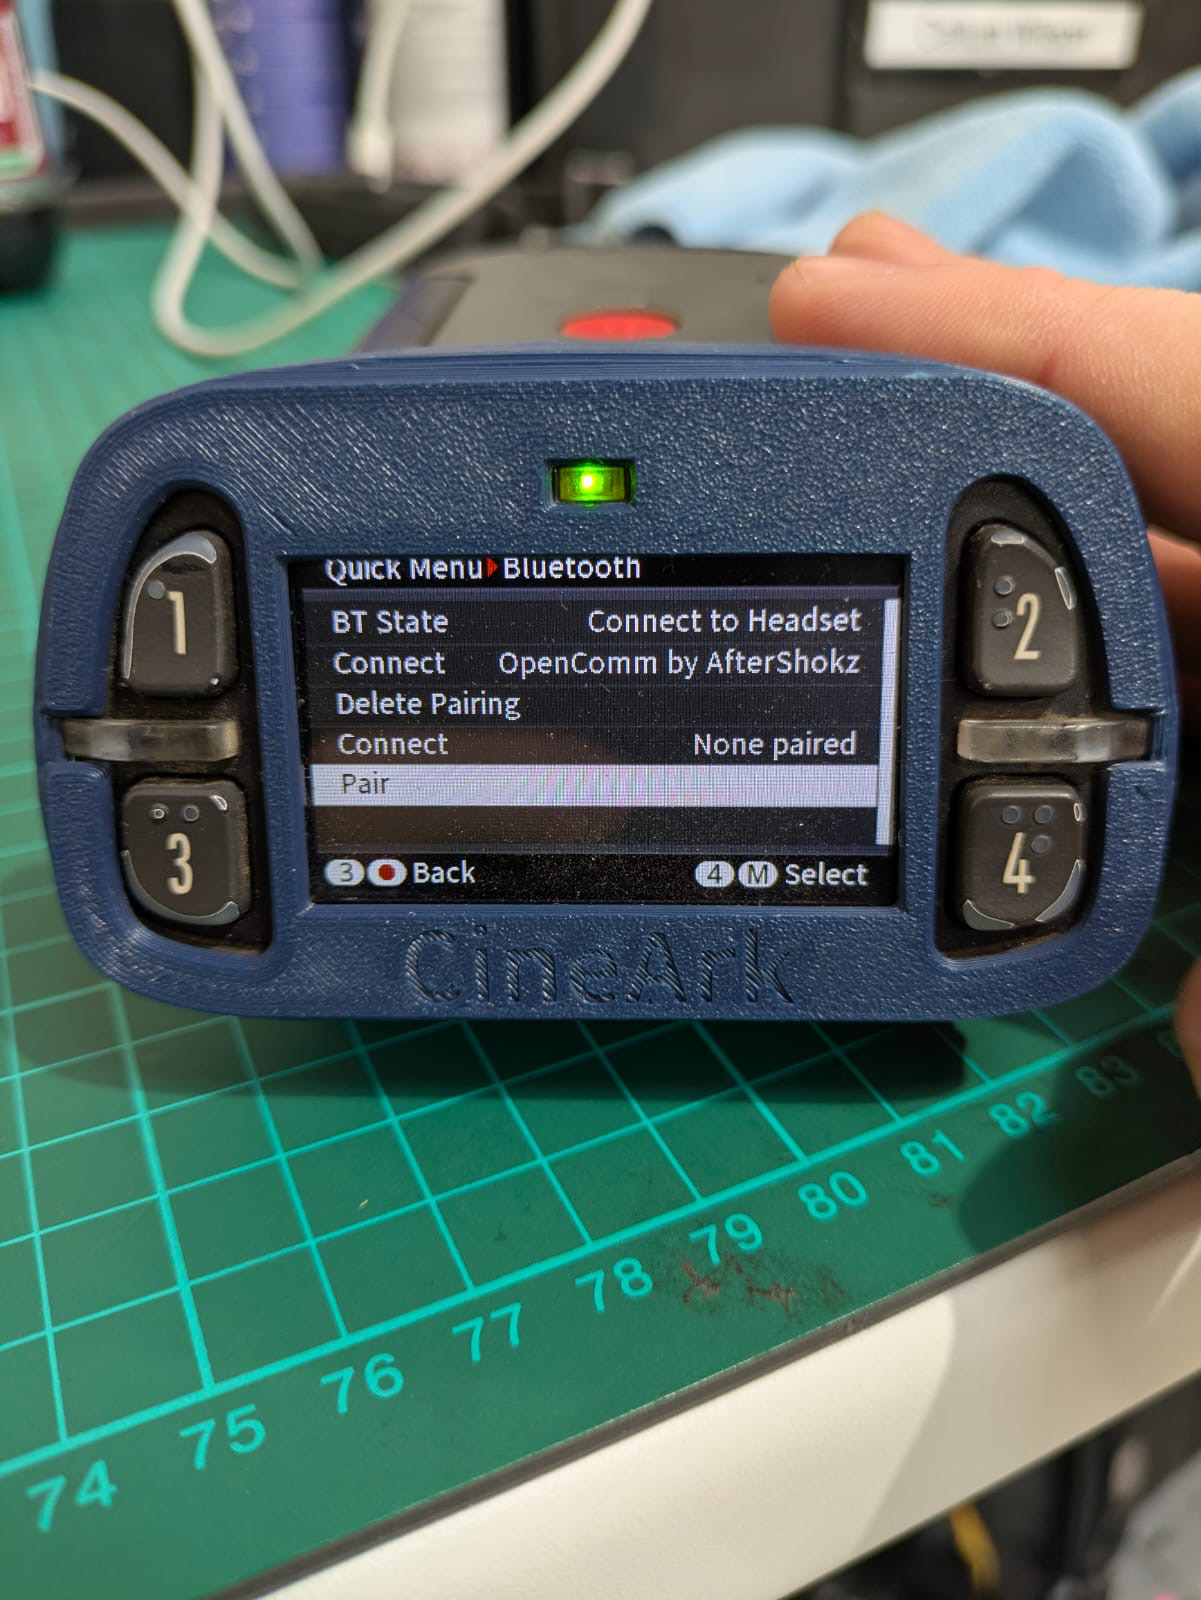
It will then search for your headset. Select your headset once it shows and follow the steps on screen.
Once your headset is connect, do a radio check on any Partyline.
If working, your friend will confirm "Good Check" as they have done previously.
Rinse and repeat steps 15 through 25 for every beltpack.
This is a good opportunity to test any BT headsets too.
Testing - Beltpacks - Check-Out:
Due to the dilligence of the check-in process, we can have the check-out process be somewhat quicker!
Find a friend and have them put on a beltpack and headset.
Put your own headset and beltpack on. Your friend can mirror the steps you are about to undertake.
Move the rotatary by button 1 to the right until the beltpack reaches max volume
Move the rotary by button 2 to the left until the beltpack reaches -18db.
Press and hold button 1. Once you have it held, say "Radio Check 1".
Your friend should be able to hear you over their headset. If they do, they should reply "Good check" on the same partyline.
Rinse and repeat step 10 & 11 for buttons 2 through 6.
Now that know both of these beltpacks and headsets are working, your friend can now latch channel 1 open by quick pressing button 1. They can now go about their day and will only need to reply Radio Check from now on.
They should note they now have an open comm. If they'd prefer not to, they do not need to latch their beltpack, this is just so they can be handsfree.
Configuration - Partylines:
A Partyline is a group communication channel where multiple users can talk and listen simultaneously, similar to a conference call, traditional two-way radio channel or Discord Channel.
This is generally configured by the operator during their prep.
Navigate to the Partyline page, using the buton at the top of the UI.
Press the + to open the menu
Select Create Partyline…
- Title your Partyline
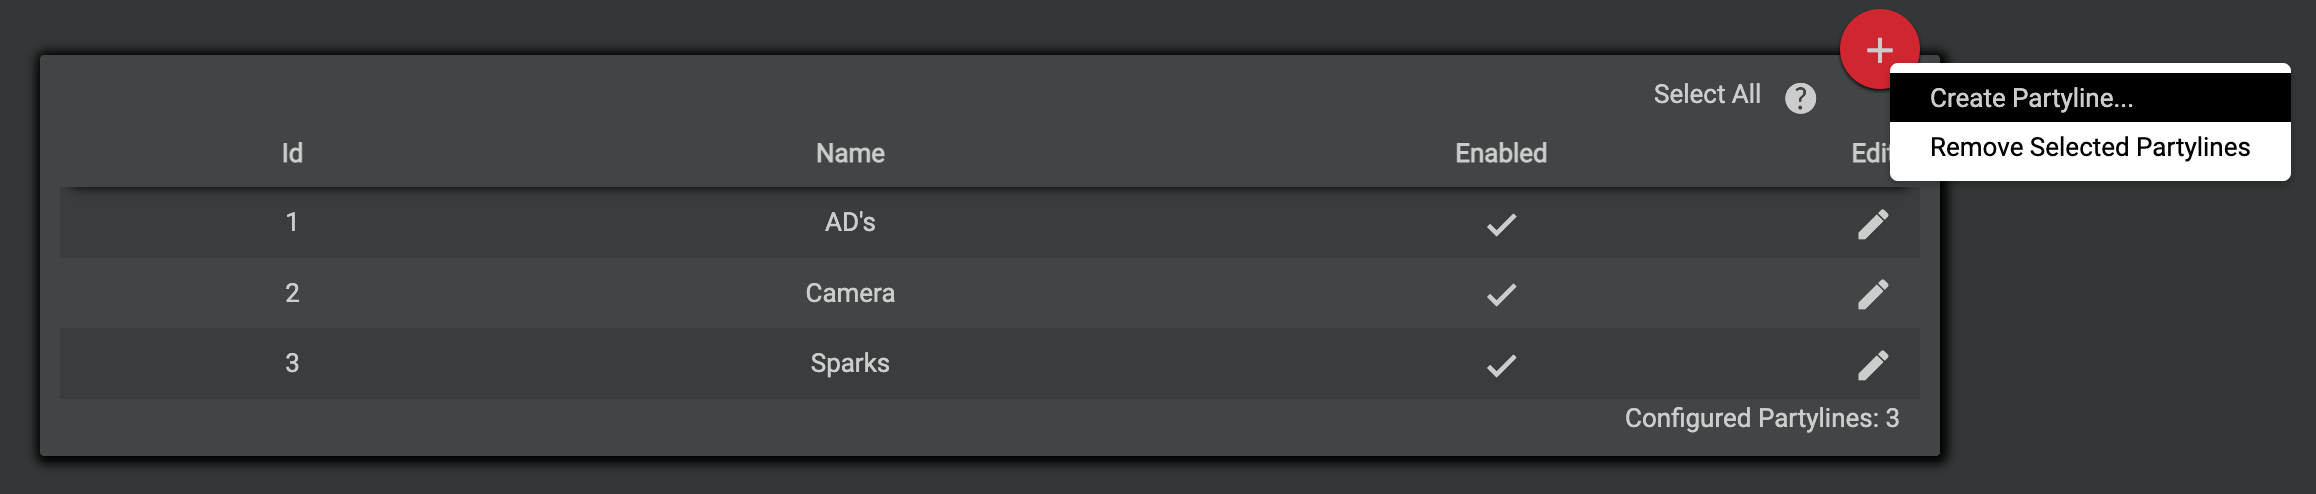
A list of partylines should be supplied by either the operator, production or the office. If not, use the following as a general guideline:
AD's
Camera
Sparks
Grip
Locations
DIT
Video
VoG - This is your Voice of God line, if required.
Radio Ch1 - This will be the first of your radio integration lines, if required.
Radio Ch2 - This will be the second of your radio integration lines, if required.
Assign an ID
Press Create.
Rinse and Repeat for your other partylines.
Configuration - Profiles:
A Profile is a preset configuration assigned to a Beltpack, defining its audio settings, key functions, and user permissions. This will help us dictate how the beltpacks interact with the various IO and Partylines at our disposal.
Like the above, this is generally configured by the operator during their prep. If have been given instructions on how they want profiles, this can be left as standard.
Integration - NSA:
NSAs or Network Stream Adapters are how we introduce external inputs/outputs into the Bolero network. This can include but is not limited to Computers, Feeds from Sound, Dante, RiFace/Taits, etc. Effectively, if it has an audio i/o we can most likely bring it into our Bolero system via the NSA.
Navigate to IO Devices using the button at the top of the screen.
Highlight the unassigned NSA (If multiple, do one at a time)
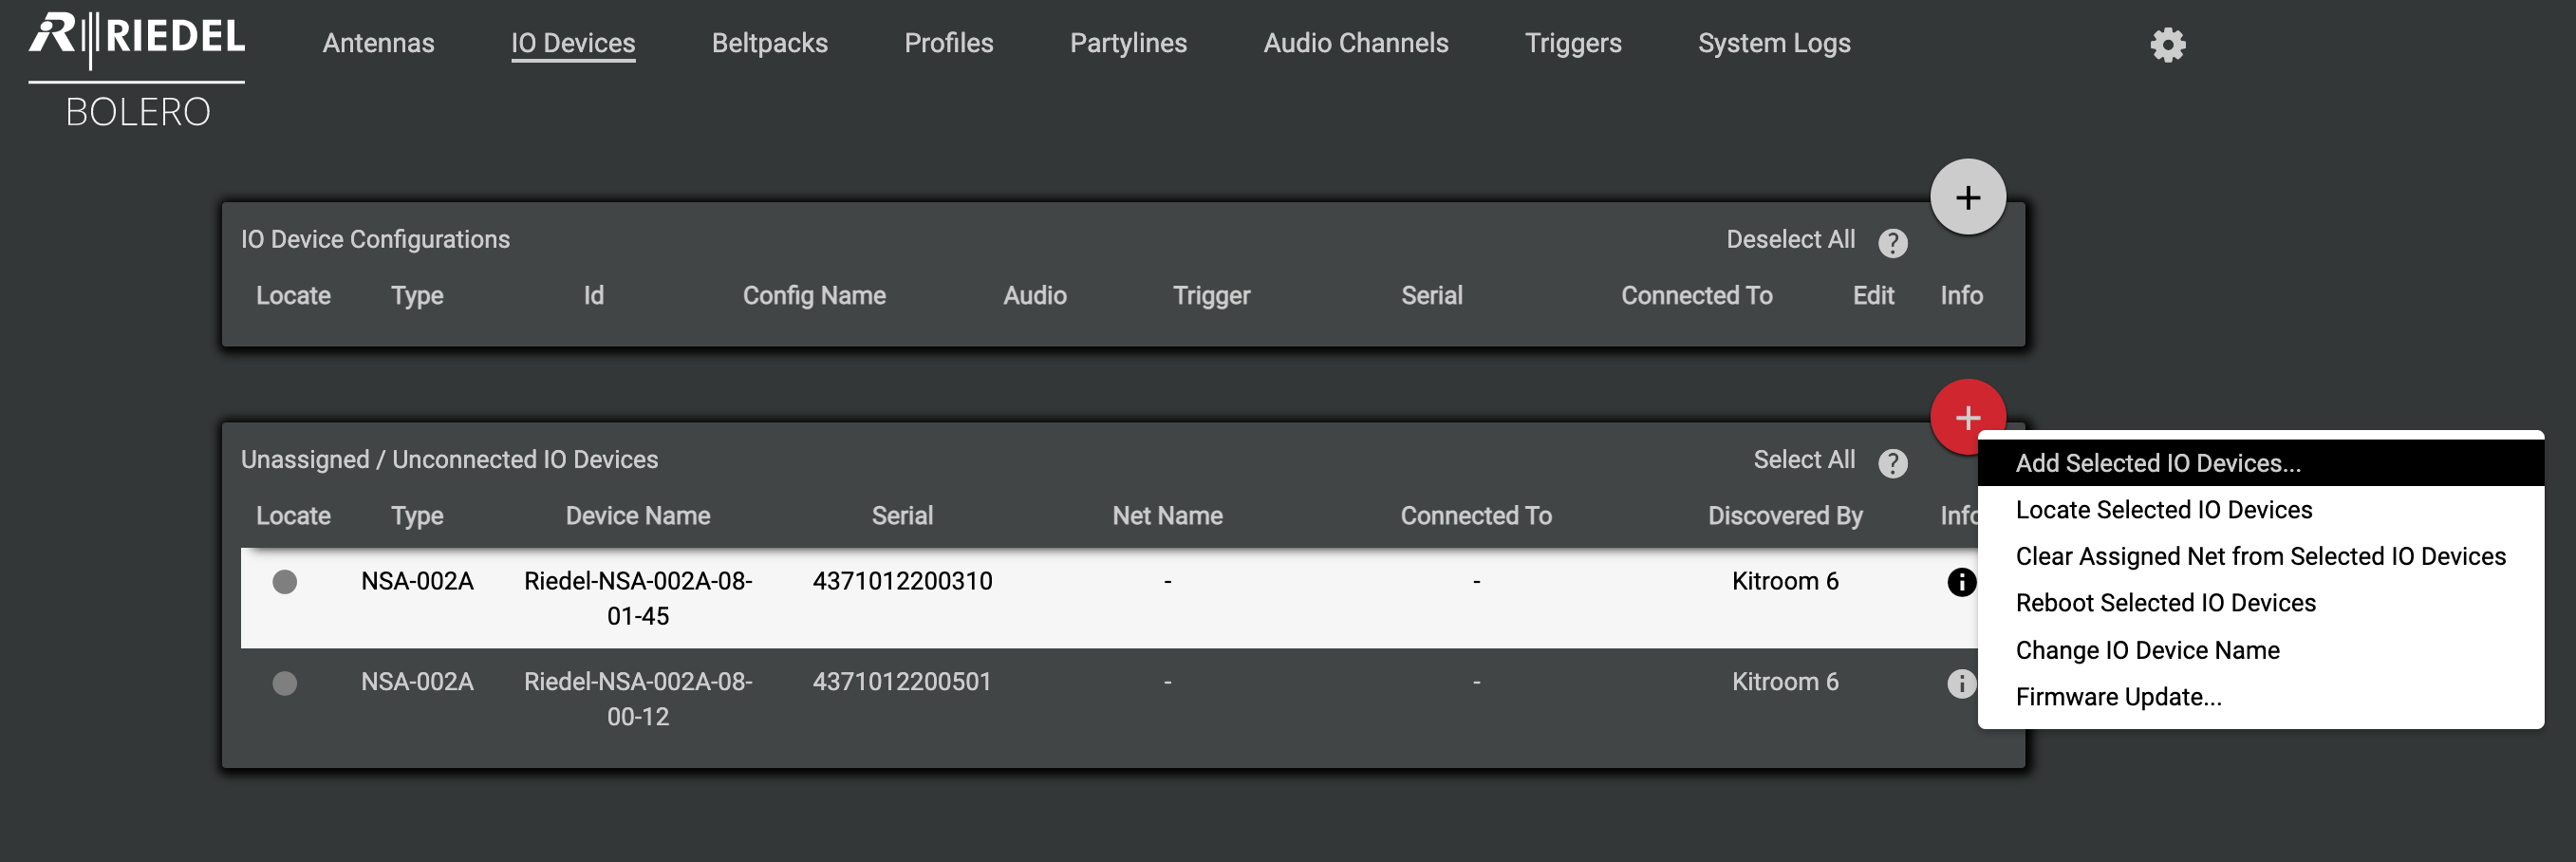
Select the +
Add Selected IO Devices…
A menu you will appear, do not change anything just press proceed.
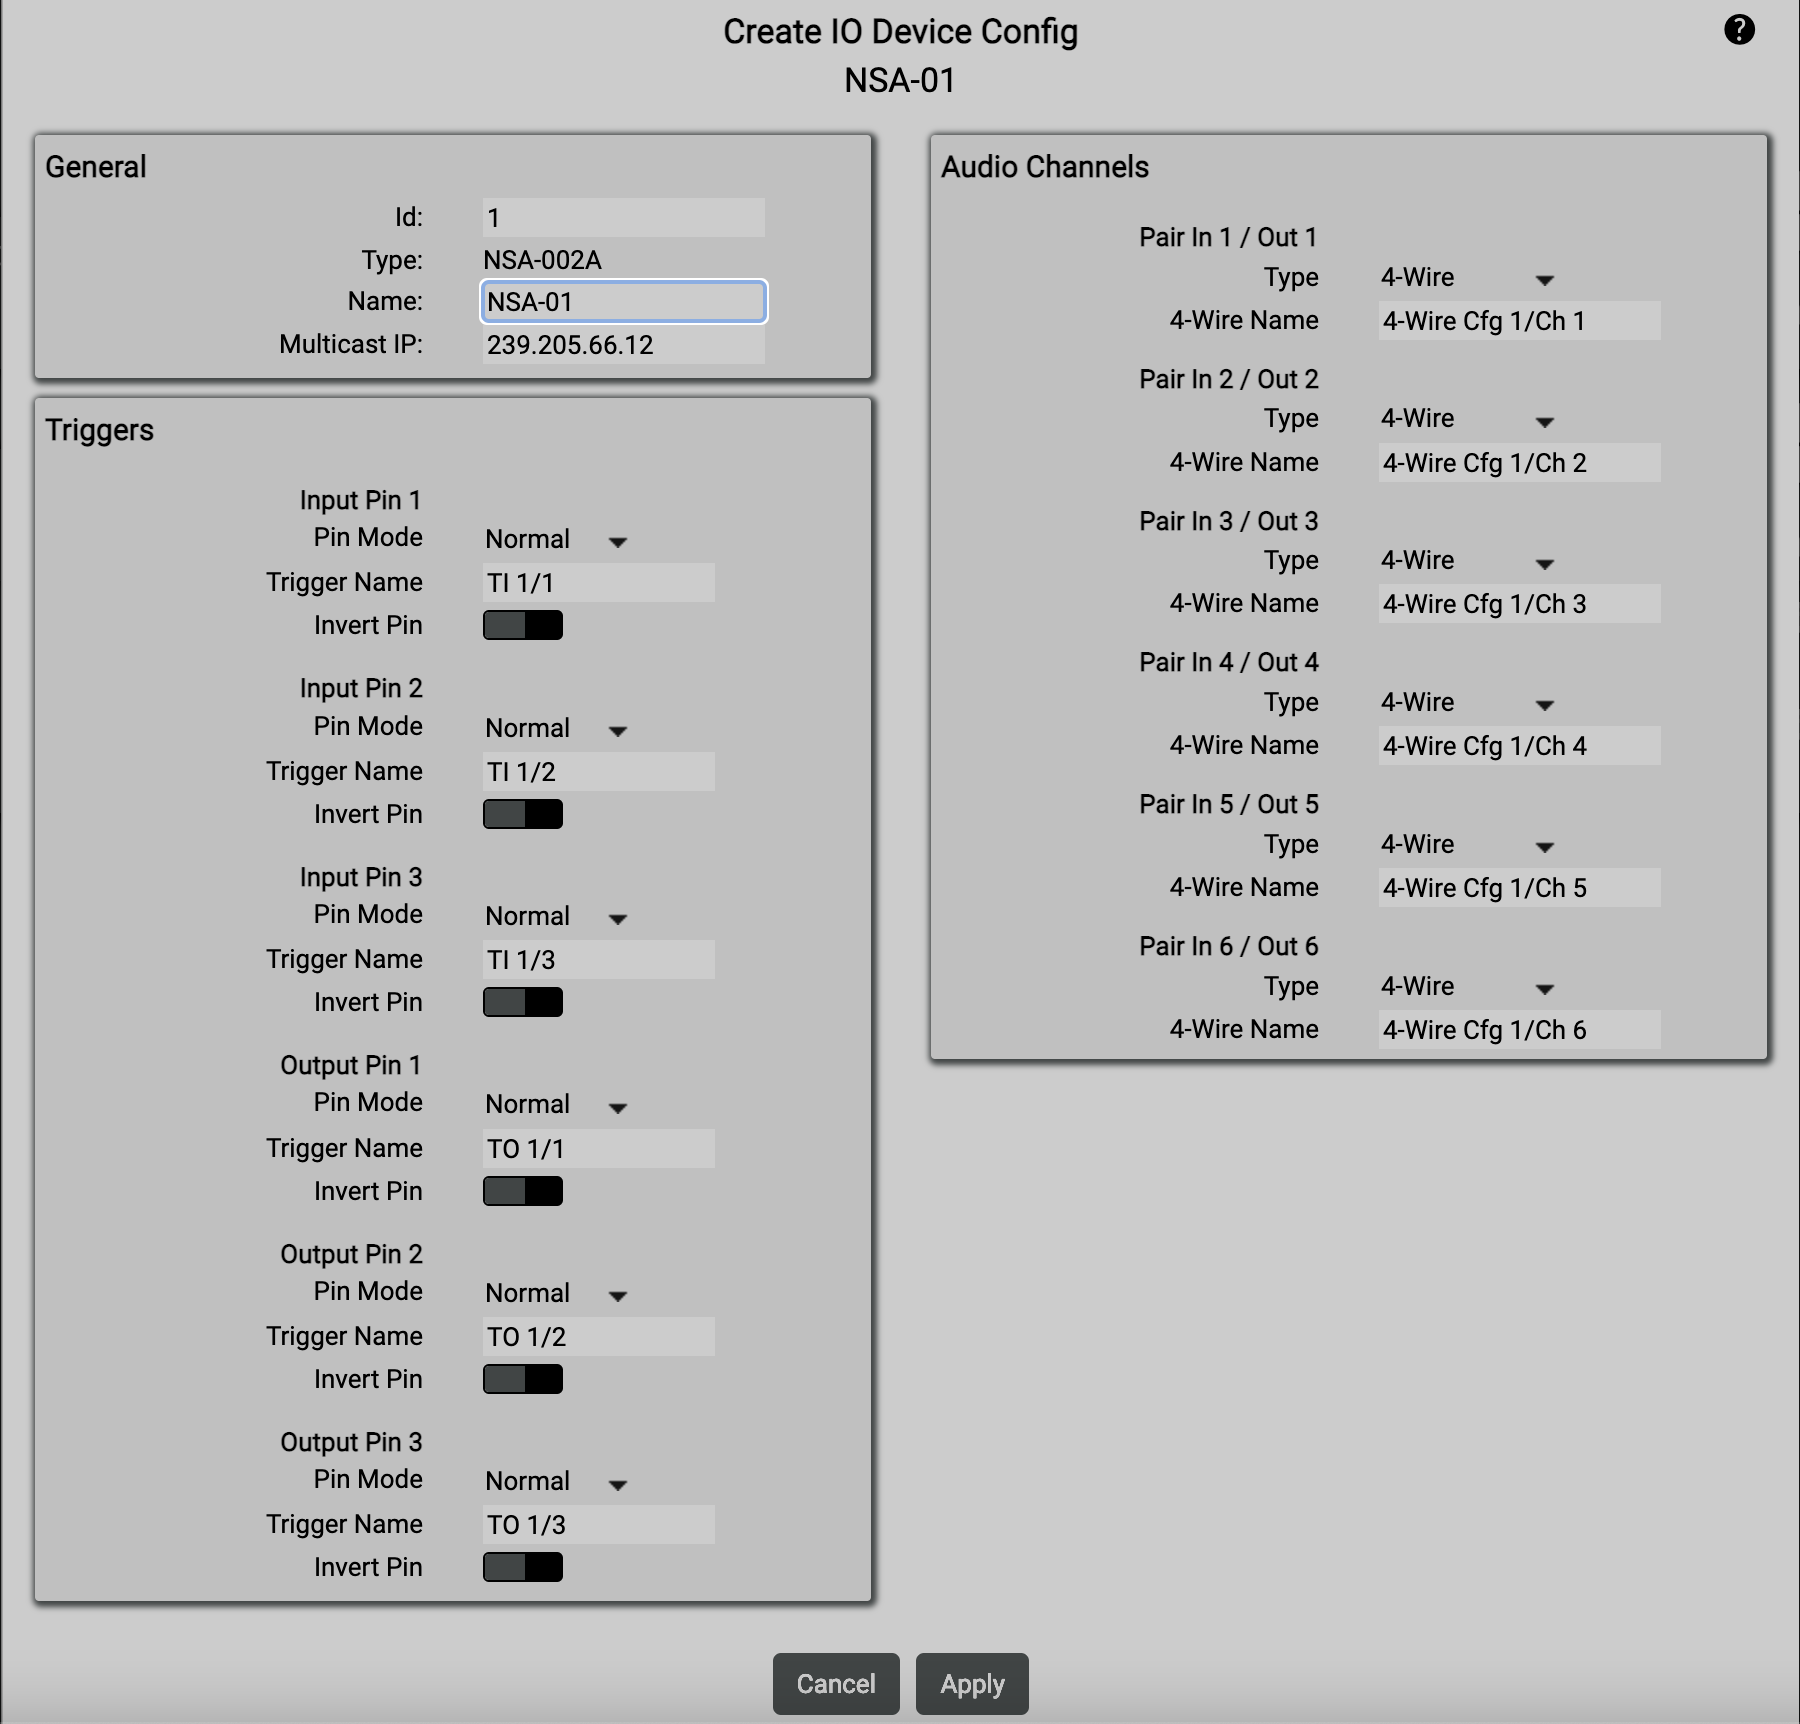
A new menu will appear. We can now name our NSA.
There is not a set way to name your NSA. I, personally, do this by context. If not, I'll leave it as NSA-01 and so on.
Leave everything else as this can be configured later down the line.
Testing - NSA (Standalone):
While unusual, we can test an NSA seperately quite easily. The way I like to do this is by doing something I call Bolero FM, which is simply just Spotify on my laptop via 3.5mm to XLR into the NSA and NSA to a speaker. To put it simply, you'll send music into the bolero network and you'll speak into a PL which will output via a speaker.
Open your IO Devices and open the NSA settings.
Make sure all in and outs are set to 4-Wire.
Go to Partylines and create a Partyline titled "Bolero FM"
Hit Apply and Navigate to Audio Channels at the top.
Go to the Always-On Tab
Add Function "Talk - Always Listen"
Set the Destination Source as Bolero FM.
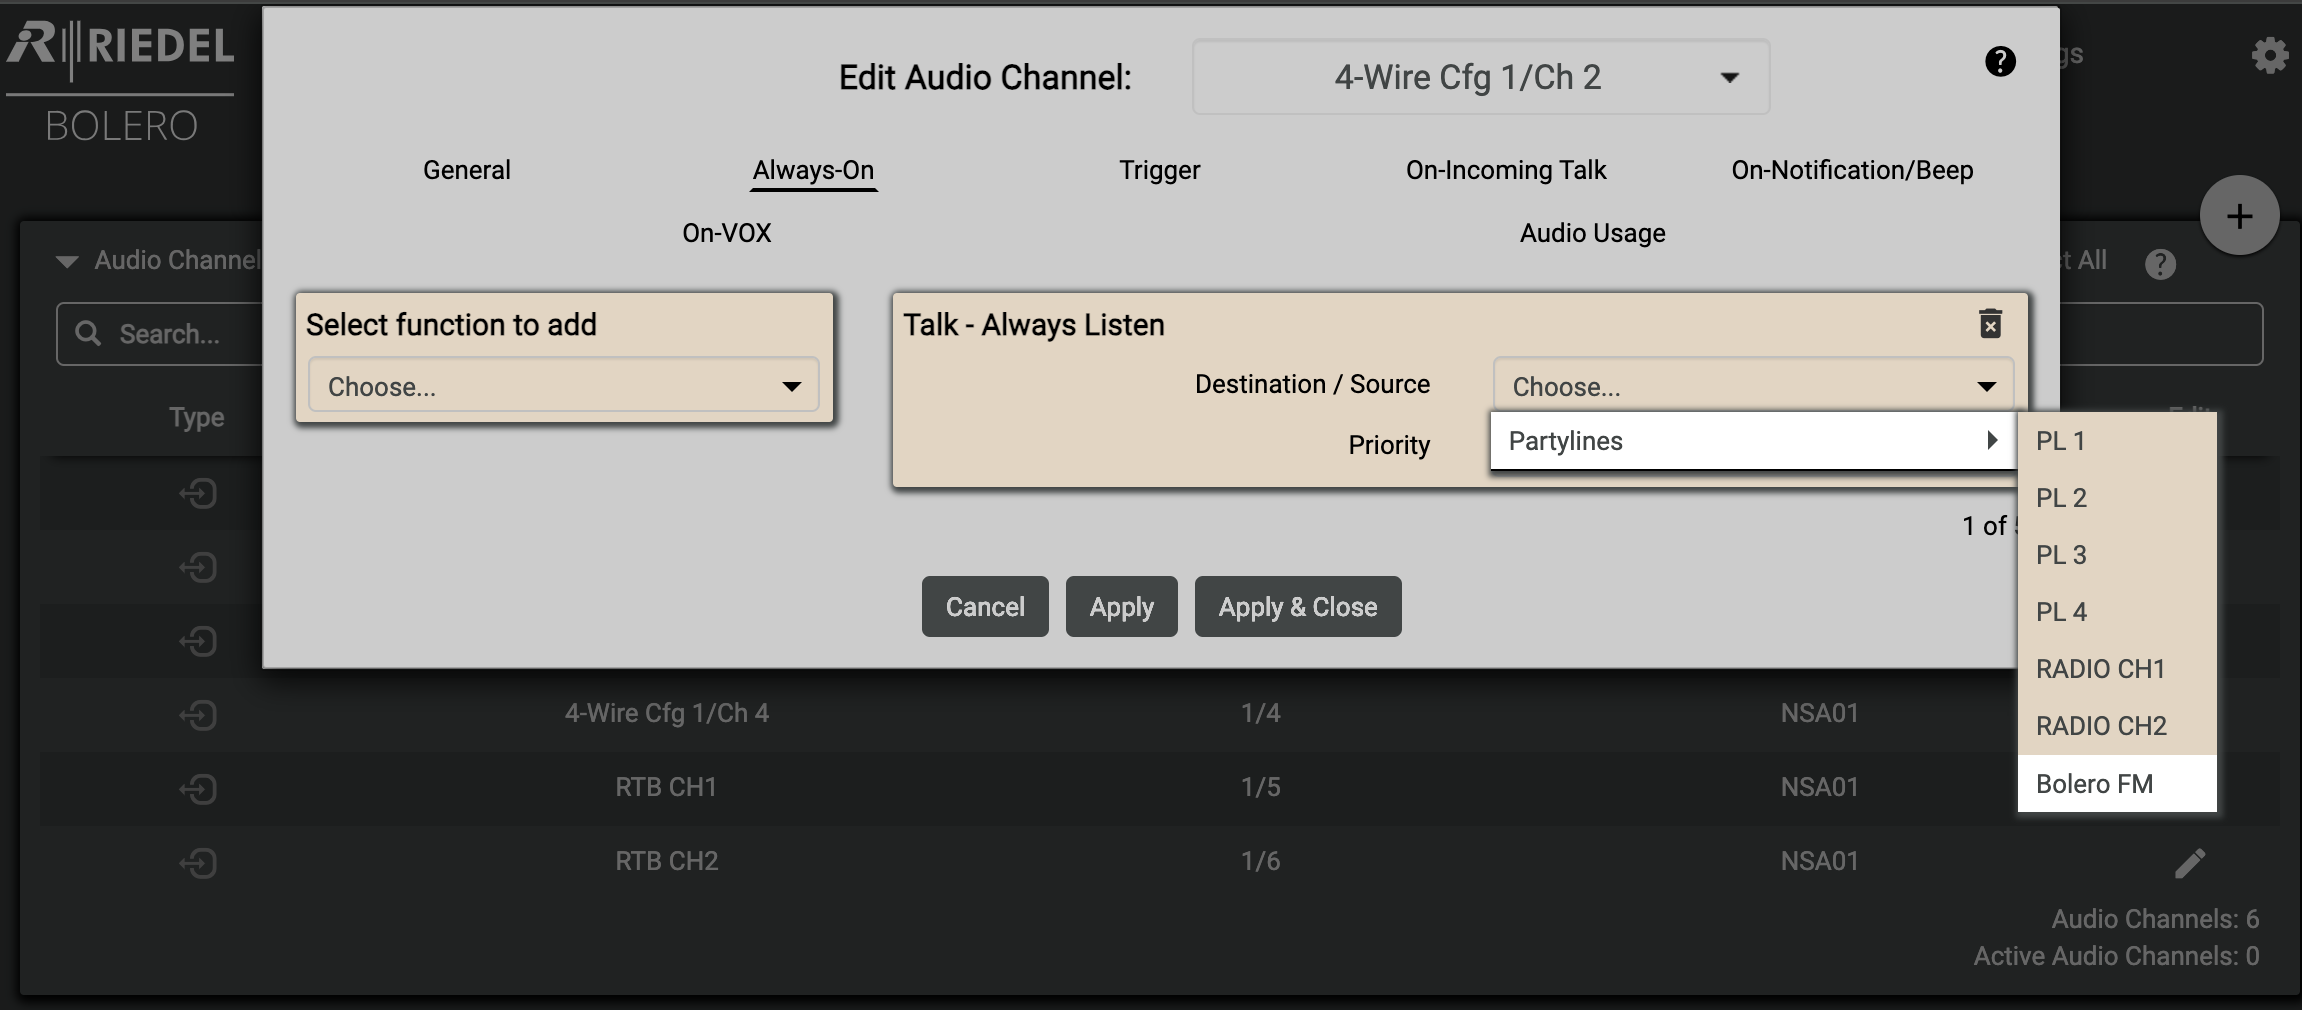
Repeat for every audio channel
Now plug an audio feed into IN 1
You should now hear your input feed.
Plug your speaker into OUT 1
You should not hear anything.
If your Bolero FM PL is on your beltpack speak on it. You should hear yourself.
If not, move your Input feed to IN 2, you will hear it come out of the speaker.
Now move the output feed across each output and you should hear something coming from the speaker.
Leave your output in the last point and do the same with the input.
Integration - RiFace:
A RiFace (Radio Interface) is a device that bridges two-way radios (walkie-talkies) with our Bolero system. The integration of the RiFace requires 3 different components. These are as follows:
Motorolla DM4600 x 2
This is what listens to the radio channels
RiFace
Provides an audio output from the radios
Noise Gate
Cleans the feed from the radio
NSA
Brings the feed into the bolero network
Glossary:
PTP:
PTP (Peer to Peer) is a network protocol used to synchronize clocks across devices like genlock/time does for video signal. It ensures that all Bolero system components (antennas, beltpacks, NSAs) operate on the same time reference, which is crucial for seamless wireless communication.
Ensures low-latency and reliable communication.
Prevents audio dropouts and sync issues between devices.
Required when using multiple antennas to maintain seamless roaming.
AES67:
AES67 is a standard that allows audio devices to communicate over IP networks. For Bolero, a wireless intercom system, AES67 ensures it can connect and exchange high-quality, low-latency audio with other AES67-compatible devices. This makes Bolero work seamlessly with other audio equipment, regardless of the brand, in broadcast and live event environments. It improves interoperability and ensures clear, real-time communication.
DECT:
DECT (Digital Enhanced Cordless Telecommunications) is a wireless standard used by Bolero to provide secure, reliable, and high-quality communication. In the context of Bolero, DECT allows users to connect their intercoms wirelessly over long distances with minimal interference, even in busy environments like live events or broadcast productions. It ensures clear audio with low latency, supports multiple connections, and offers secure, encrypted communication. This makes DECT an ideal solution for real-time, mobile communication in large-scale, professional settings.
NSA:
A Network Stream Adapter (NSA) in a Bolero system is a device that integrates external audio sources (like walkie-talkies, PA systems, lines from sound or Dante networks) into the Bolero intercom system.